This is a work of personal compilation and research over several decades by our president, Historian Harley Davidson, RoadRatDan Daniel Mancin, whose goal is to share various technical subjects related to motorcycles and tips for safe riding, as a contribution to the motorcycling community worldwide.
RR18
**Recommendations before a long motorcycle trip**
1. **Check your motorcycle:**
- If the battery is over three years old, replace it.
- If the tires have less than 75% tread life, replace them.
- If the engine oil has over seven thousand kilometers, change it.
- Carry a tire repair kit.
- Have a battery assist system on hand.
- Bring the minimal necessary tools, plus zip ties, wire, and duct tape.
- Make sure to carry current vehicle documents, license, and ID.
- Verify that your insurance includes coverage for towing, repairs, or accidents if traveling abroad.
- Have extra keys and fobs for the motorcycle, which can be carried by your partner or one of your companions.
2. **What you should take with you:**
- Prescription medications.
- Glasses for day and night.
- Sunscreen, cap or hat, and hydration (water).
- Extra gloves and rain gear, if needed.
- Confirm your insurance covers hospitalization and emergencies; process the European Health Insurance Card.
- Check that your debit or credit card works at tolls.
- If you have any medical allergies or special conditions, inform the group, or at least two of your companions.
- Bring masks, in case they are required.
- Have a written list with addresses of the places and hotels where we will stay or meeting points, in case there are difficulties with the language or pronunciation.
- Carry COVID-19 vaccination certificates, in case they are required.
- Always leave room in your luggage to buy items, like t-shirts or souvenirs; bring an additional collapsible bag with straps to secure your exterior luggage.
- Ensure you have roaming on your phone for the countries we will visit, along with the appropriate chargers and connectors.
These recommendations will make your trip and that of your companions easier and safer.

Consider the following information and skills
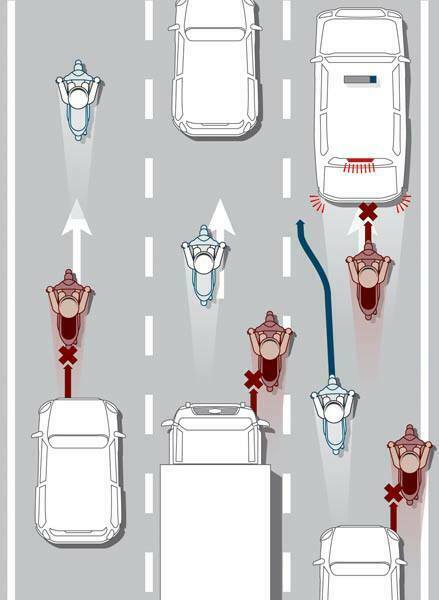
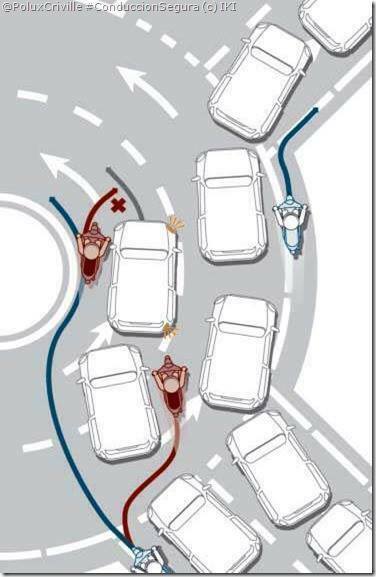
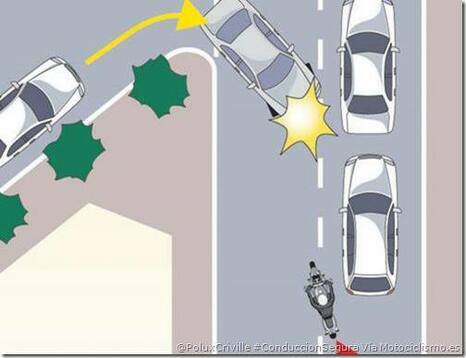
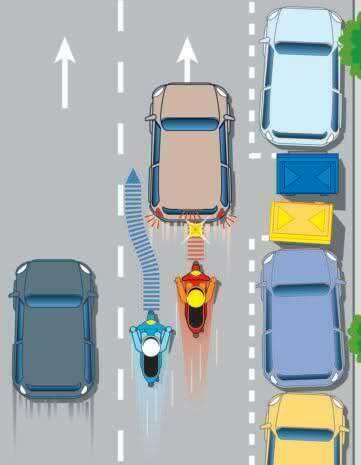
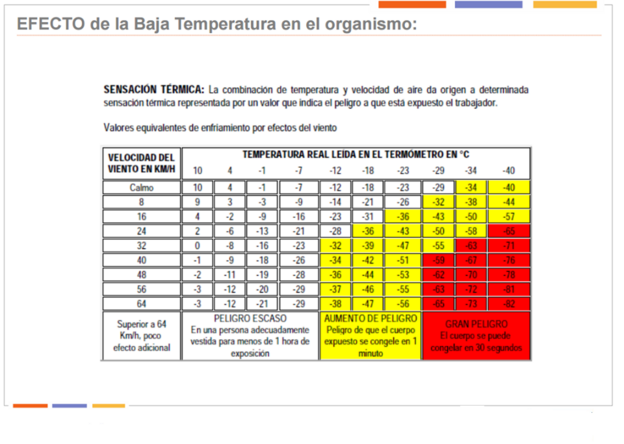
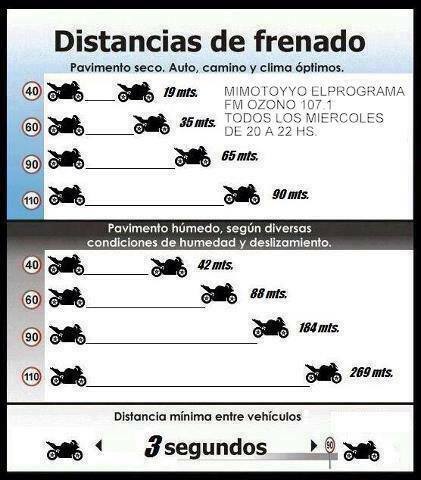
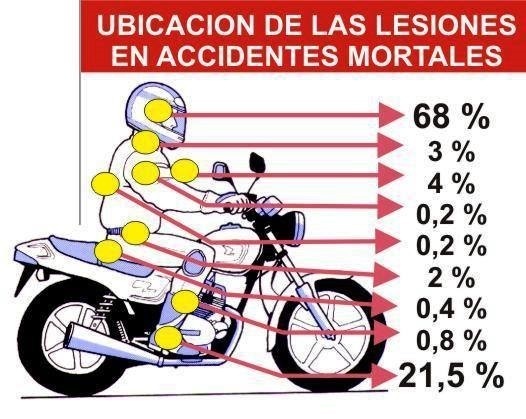
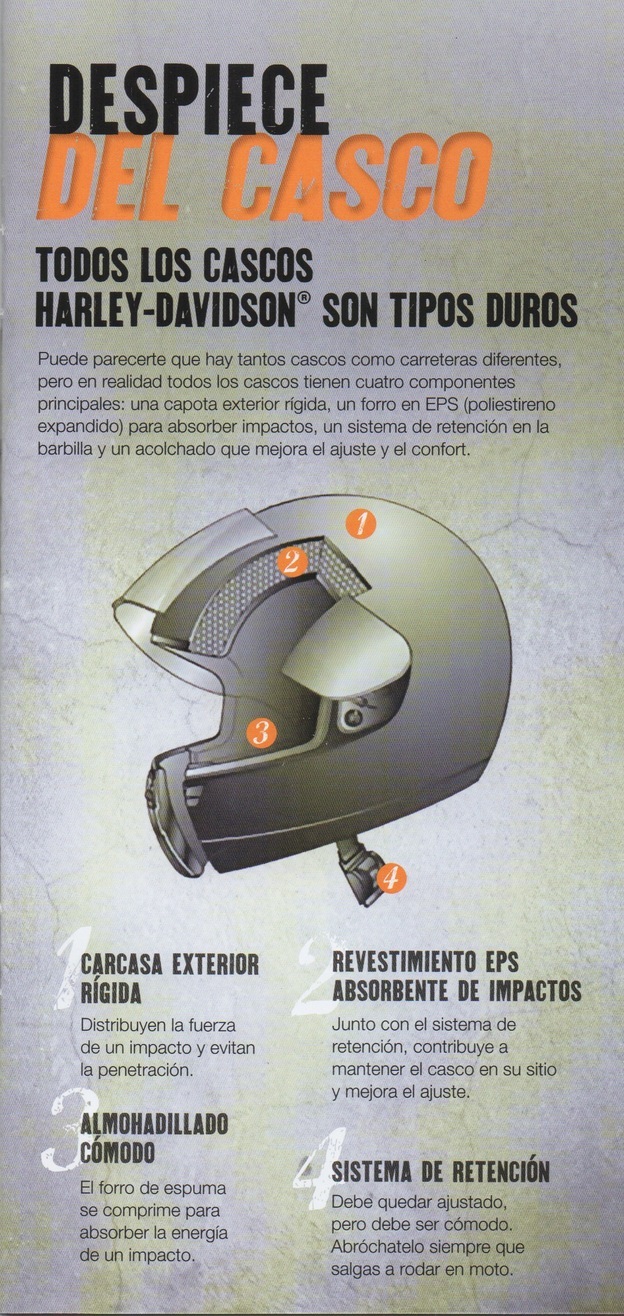
Helmets
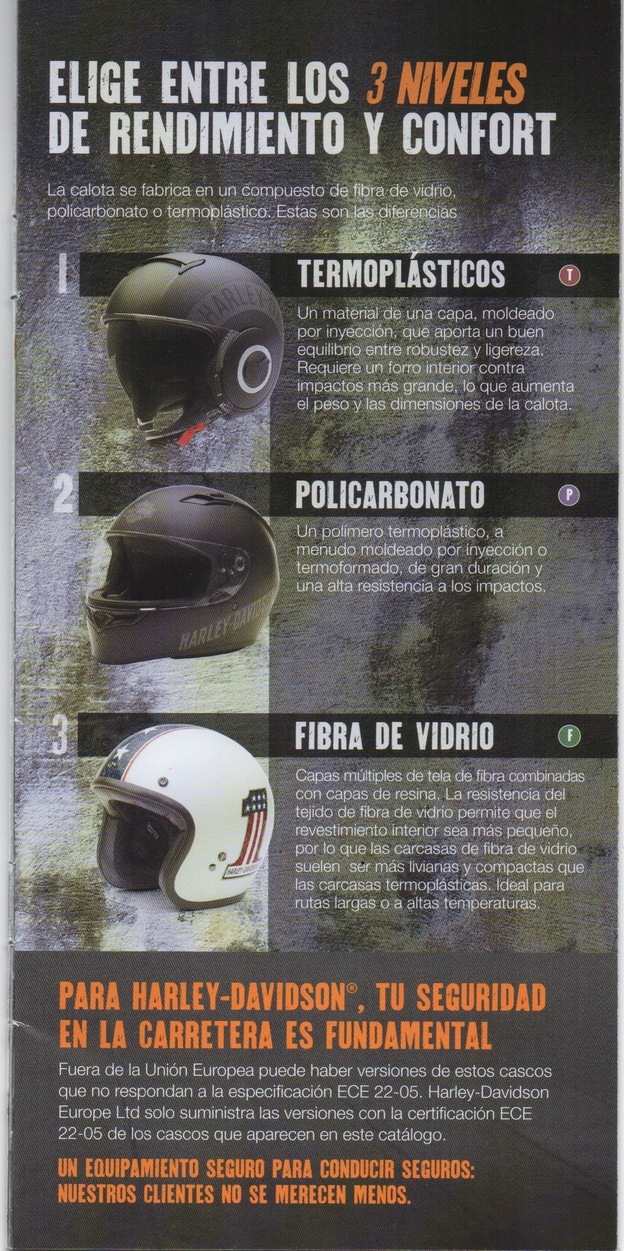
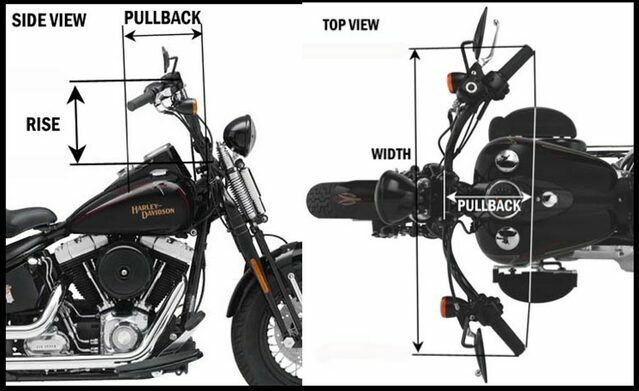
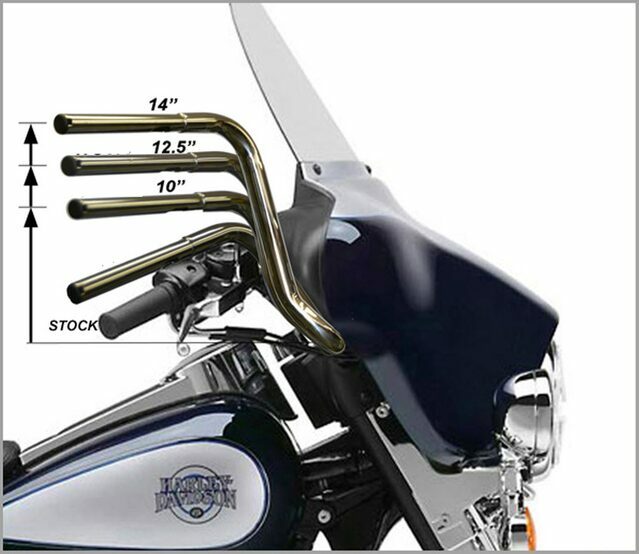
Steering (Handlebar)
Lubrication
Do not change lubricant brands indiscriminately as some lubricants interact chemically when mixed. The use of inferior lubricants can damage the engine.
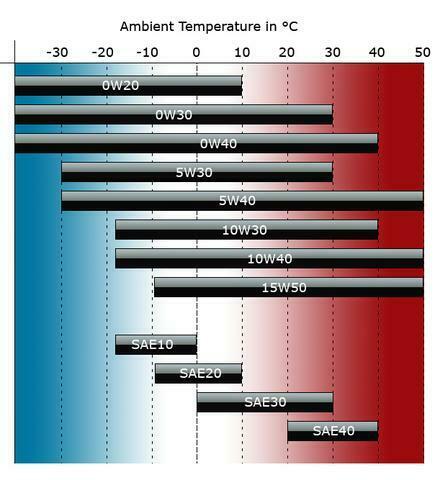
Motor oil is a key factor for the operation and lifespan of the engine. Always use the appropriate grade of oil for the lower temperatures expected before the next scheduled oil change. See Recommended Motor Oils.
This motorcycle was originally equipped with GENUINE HARLEY-DAVIDSON MOTORCYCLE OIL H-D 360 20W50. Under normal operating conditions, the preferred oil is H-D 360. If extreme cold or heat operation is anticipated, see the available selections in Recommended Motor Oils.
If necessary and if H-D 360 is not available, add certified diesel engine oil. Acceptable designations include: CH-4, CI-4, and CJ-4. The preferred viscosities in descending order are: 20W50, 15W40, and 10W40.
At the first opportunity, consult an authorized dealer to switch back to 100% Harley-Davidson oil.
|
|
|
|
| |||||
|
|
|
|
| |||||
|
|
|
|
| |||||
|
|
|
|
| |||||
|
|
|
|
| |||||
|
|
|
|
|
1. Start the engine until the motor oil reaches operating temperature.
2. Keep the motorcycle on the parking stand while idling for one or two minutes. Turn off the engine.
3. Park the motorcycle on a level surface on the parking stand.
4. Remove the fill cap. Clean the dipstick and reinstall the fill cap on the tank.
Brakes
Front Brakes: Place the motorcycle upright (not tilted on the parking stand) on a level surface. Turn the handlebars so that the top of the brake reservoir is level.
See Low brake fluid level marks. Compare the fluid level in the reservoir sight glass with the low level mark (1).
Rear: Place the motorcycle upright (not tilted on the parking stand) on a level surface. Compare the fluid level in the reservoir sight glass with the low level mark (2).
If the fluid level is below the minimum level mark or is absent in the front or rear brake reservoir, consult a Harley-Davidson dealer.
Verify that the front brake lever and the rear brake pedal feel firm when applied. If the brakes are not firm, the brake system needs to be bled. Consult a Harley-Davidson dealer.
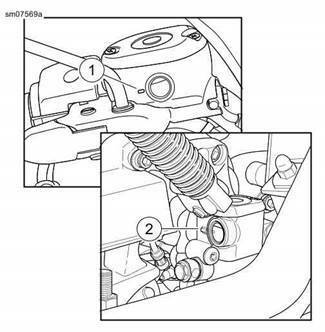
Low brake fluid level marks
1. Front
2. Rear
Make sure the wheel and brake caliper are aligned. Riding with a wheel or brake caliper misaligned can cause the brake disc to seize and result in loss of control, potentially causing death or serious injury.
Inspect the rear brake disc while it is rotating. The disc should rotate level within the brake caliper.
See Thickness of brake pads XL. Using a thin plastic ruler measure the thickness of the brake pad's friction material. For the rear brakes, place the ruler against the brake disc through the gap along the caliper.
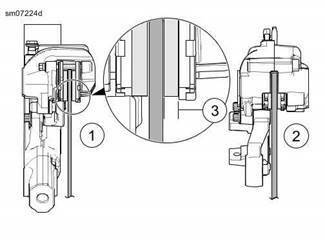
1. Front, viewed from below
2. Rear, viewed from above
3. Thickness of the pads
Thickness of brake pads XL
NOTE: Always replace brake pads in pairs.
If the friction material of the brake pad is at minimum thickness or less, replace the pads.
Consult a Harley-Davidson dealer. See Minimum thickness of brake pad friction material.
Tires
Harley-Davidson tires have wear bars that run horizontally across the tread. When a tire has worn down to the point where the wear bars become visible, or when the tread has a depth of only 1/32 inch (0.8 mm), the tire may:
Be more easily damaged, causing tire failure.
Provide less traction.
Affect stability and maneuverability.
Replace tires with new tires before the tread wear bars become visible:
See Tread design: Michelin Tires or Tread design: Dunlop Tires. The indicators (1) on the sidewalls of the tire point to the wear bars (2) on the tread.
The tread wear bars appear in the tread pattern when 1/32 inch (0.8 mm) or less of tread remains.
1. Indicator
2. Tread wear bars
Tread design: Michelin Tires
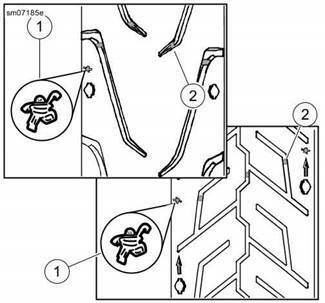
1. Indicator
2. Tread wear bars
Tread design: Dunlop Tires
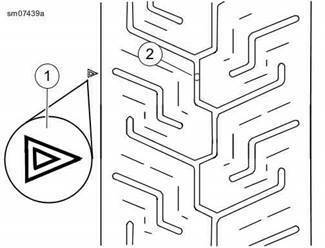
Tire types
1. Slicks: are tires that have no tread. They are used for competition and have a short lifespan due to their demanding nature. Their compound is soft, offering greater grip and reaching very high temperatures during use. They are not suitable for public roads.
2. Sport: characterized by having a soft rubber with little tread or design on their casing; their operating temperature is quite high, and they are distinguished by good grip on asphalt in dry and wet conditions. Their use is generally for road, although they could occasionally be used on circuits.
3. Touring: their rubber is soft and hard, has a more pronounced tread pattern and a wider contact patch; characterized by having better grip and durability. Their operating temperature is lower than sport tires. Their use is more urban and for road trips.
4. Street: provide good adherence to the ground and have a greater tread pattern that makes them practical for wet surfaces. Their rubber is harder, they have a longer lifespan, and their operating temperature is low. They are ideal for the city and short trips.
5. Dual-purpose: designed for motorcycles that can go on both paved terrain and unpaved roads. They have more pronounced and wider grooves forming treads that reduce contact with the ground, so it is advisable to use them on asphalt. They have a low operating temperature and hard rubber.
6. Off-road: these tires have more pronounced treads in order to achieve greater grip in uneven and muddy terrains, although they degrade quickly. They are used for enduro or motocross. Due to the shape of their treads, it is not advisable to use them on other surfaces.
7. Scooter: are references created for scooters or maxi-scooters. They tend to have a smaller diameter and come in different types. Their lifespan is relatively long and they are suitable for city use.
8. Trail: these are tires specialized for bikes used in trials; they are distinguished by having numerous treads and are designed to work with very low air pressures.
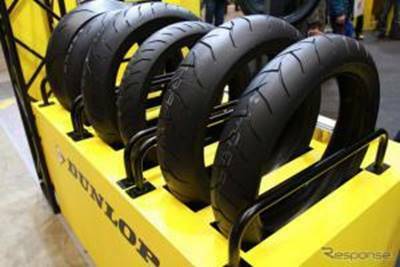
The word tire itself refers to "that works with air" and there are, in fact, many other "pneumatic" things; it has been reserved in everyday and technical language for the part of reinforced rubber with fibers and filled with compressed air of the wheels of machines. It is impossible to try to cover in a short article the enormous variety of particularities, types, and characteristics of tires; however, we will address here the most important considerations in some detail.
History
The first pneumatic tires appeared in the early 20th century; they consisted of several layers of waterproofed canvas formed into a tube and mounted on a metal rim. These early tires helped alleviate the rough ride caused by the wooden or metal wheels used on vehicles of the era—which had to traverse uneven roads previously used mainly by animal-drawn carts—though their durability was limited to just a few kilometers. Later, while experimenting with the sticky latex from the rubber tree, Charles Goodyear discovered that heating it with sulfur caused a significant change in its properties: it ceased to be sticky and became highly elastic—retaining that elasticity over time—qualities that natural latex lacked. He named this process "vulcanization" in honor of Vulcan, the mythological god of fire.
An Italian named Michelin conceived the idea of using this material created by Goodyear to bond, fill, and waterproof the canvas layers of the tires of that time; thus, the durable tire was born. Over time, the canvas layers were replaced by increasingly strong and durable fiber layers, the design was refined, and carbon black fillers were added. Within a few years, the tire had evolved into an excellent, safe, smooth-riding, high-traction, and highly durable vehicle component. Faced with a latex shortage in Germany during World War II and driven by wartime needs, the country began searching for a substitute for natural rubber; this process led to the creation of synthetic rubbers made from petroleum-derived isoprene. These rubbers, whether used alone or blended with natural rubber, exhibited superior qualities compared to pure rubber; this marked the beginning of an endless race to improve synthetic rubbers, ultimately resulting in the state-of-the-art tubeless radial tires we use today.
Tire components.
A tire consists of several distinct parts found in most models; these include:
The bead. This is the section reinforced internally with steel wires that allows the tire to seat securely against the rim or wheel. The tire body (or casing). This forms the main structure of the tire and is composed of multiple layers of synthetic fiber, steel, or mixed-material fabrics; these are embedded in rubber and bonded tightly together to create a single, solid unit.
The tread. This is a thicker, flat band of fiber-reinforced rubber (at its base) that is bonded to the tire body in the area where the tire makes contact with the road.
The outer surface of the tread features grooves or patterns designed according to the tire's intended use. Radial cords. Tread grooves. With the exception of specialized high-traction tires—such as those used on agricultural tractors, certain construction machinery, and other niche applications—all tires feature grooves or patterns with complex, often winding shapes in the semi-flat area that contacts the pavement.
These grooves serve to channel away water, mud, or snow that would otherwise tend to wedge itself beneath the tire as the vehicle travels over surfaces covered in these materials. Contrary to popular belief, these tread patterns do not play a critical role in tire grip on clean, dry roads; however, their depth is crucial on wet or snowy roads. Without them, the wheel can literally "float" on the wedge of water trapped underneath, losing all road grip and, consequently, stability.
For this reason, authorities in many countries establish minimum tread depth limits, beyond which a tire is no longer fit for use. An experienced driver knows that with worn tires, they must exercise extreme caution and significantly reduce speed when it rains. Many accidents occur because this factor is overlooked.
Tire inflation pressure. Correct inflation pressure is equally important for road safety and tire longevity. The proper pressure is not determined solely by the tire type; rather, it is established based on a combination of influencing factors, including the tire's position on the vehicle, the vehicle's intended use, and axle loads. Tire manufacturers generally specify only maximum—and sometimes minimum—inflation pressure values; it is up to the vehicle manufacturer to determine the optimal operating pressures, and these values must be strictly adhered to. In light vehicles, it is common to find...

The diagram above shows how the tire's contact patch interacts with the road under different inflation states; the effect has been somewhat exaggerated for clarity.
Influence of inflation pressure on durability.
When pressure is low, the tire sidewalls bulge excessively; this results in additional "kneading" of the tire material, which can cause deterioration within just a few kilometers due to overheating, as well as excessive fuel consumption. Note also that the tread tends to curve upward in the center, restricting road contact to the outer edges; these edges wear down rapidly, significantly reducing the tire's lifespan. Conversely, with high inflation pressure, the tire's cross-section tends to become more rounded; in this case, the contact area with the road is limited to the center of the tread, leading to premature wear in that area and a significant loss of service life.
Environmental impact
Tire lifespan is finite; once a certain level of wear is reached, they are no longer usable and must be discarded. Since the worn portion represents only a tiny fraction of the tire's total volume, the tire is essentially discarded almost in its entirety in terms of material composition. Only a small portion of this material is recyclable—meaning it can be reclaimed and reused by specialized industries—while the rest poses a problem for landfills for two main reasons:
§ Tire material has a very long lifespan, taking decades or even centuries to degrade.
§ Some by-products of tire degradation are harmful to the environment.
TIRES: THE CONNECTION TO THE ASPHALT
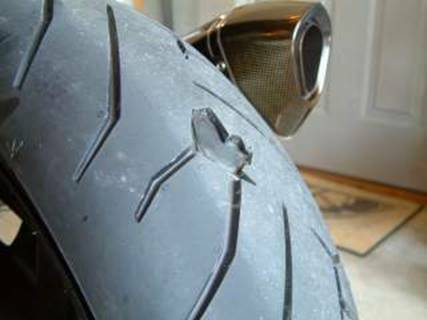
New tires owe their glossy appearance to the agents used during the molding process—specifically, a lubricant known as "mold-release wax." This lubricant makes the surface of a new tire extremely slippery. Therefore, it is essential to ride gently for the first 30 to 50 km, allowing normal wear to remove the mold-release wax from the tire's surface so it can provide its standard level of grip. Tire wear is measured using the wear indicators located within the tread pattern. When the tire wears down to this indicator, it must be replaced, as the mark signifies that the tire has reached the minimum legal tread depth. In fact, it is advisable not to wait that long and to replace the tire sooner. For one thing, as the tire wears, the tread grooves become shallower, reducing their ability to channel water away. Compared to a new tire, the risk of hydroplaning increases and grip decreases in the rain. Once the wear indicator is reached, the tire has lost its water-evacuation capability. Furthermore, regardless of tread depth, a tire loses its performance qualities due to temperature cycles. Every time the vehicle is driven, the tire undergoes a temperature cycle: it heats up and then cools down. Repeated cycles eventually alter the tire's characteristics—specifically, it loses grip. Finally, even without being driven, a tire ages and hardens simply over time. The tire's materials and structure eventually lose their original properties. This aging process sometimes manifests visually as cracking.
Consequently, if you buy a used motorcycle that has not been ridden for a year or more, it is essential to replace the tires, even if they appear to have little wear. New tires owe their shiny appearance to the products used during the molding process—specifically, a lubricant known as "mold-release wax." This lubricant makes a new tire extremely slippery. That is why it is crucial to drive gently on the tire for 30 to 50 km—long enough for normal wear to remove the mold-release wax from the tire's surface and allow it to provide its standard level of grip. Tire wear is measured using the wear indicators located within the tread pattern. When the tire wears down to this indicator, it must be replaced, as the mark signifies that the tire has reached the minimum legal tread depth. In fact, it is advisable not to wait that long and to replace the tire sooner. For one thing, as the tire wears, the tread grooves become shallower, reducing their ability to channel water away. Compared to a new tire, the risk of hydroplaning increases and grip decreases when it rains. Once the wear indicator is reached, the tire has lost its water-evacuation capability. Furthermore, regardless of tread depth, a tire loses its performance qualities over time due to temperature cycles. Every time the vehicle is driven, the tire undergoes a temperature cycle: it heats up and then cools down. The repetition of these cycles eventually...
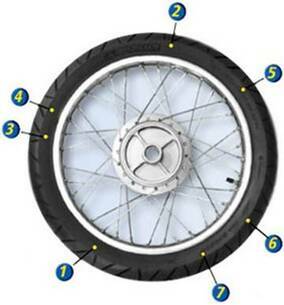
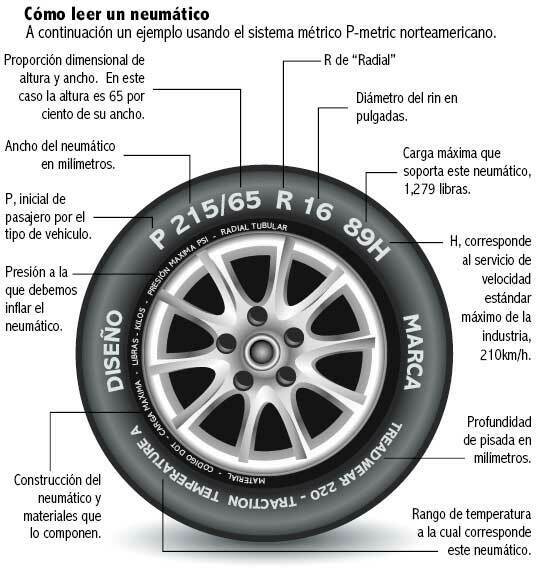
DO YOU UNDERSTAND THE MEANING OF TIRE NOMENCLATURE?
Learn to decipher the numbers and letters on your motorcycle's tire sidewall.
1. Tire brand indicates the company responsible for manufacturing the product.
2. Tire model (according to tread pattern).
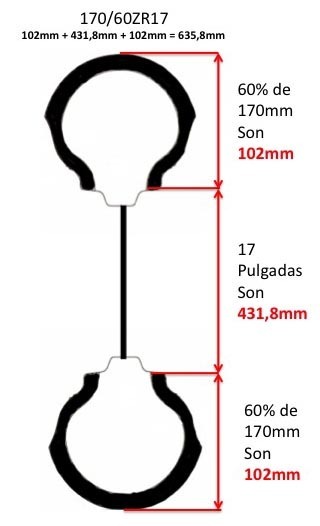
3. Tire size
Example 1: Diagonal tire size for motorcycle: 90/90 – 18. 90 width of the tire in millimeters. 90 ratio of tire width to sidewall height. The dash (symbol –) indicates that the tire structure is diagonal. 18 inner diameter of the tire in inches.
Example 2: Radial tire size for motorcycle: 180/55 ZR17. 180 width of the tire in millimeters. 55 ratio of tire width to sidewall height. ZR indicates it is a sport tire (Z) with a radial structure (R). 17 inner diameter of the tire in inches.
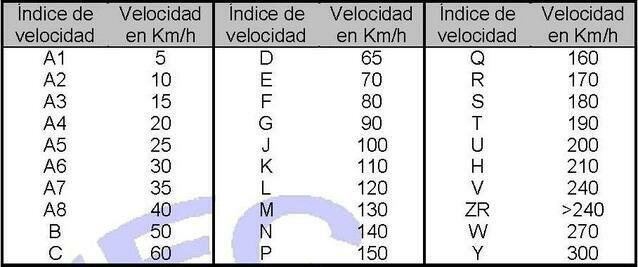
4. Load and speed index.
Indicate the recommended limits for tire use in load and maximum speed. Consult the correspondence between the codes printed on the tire's sidewall and the capacity in kilograms or kilometers per hour in the table found in this manual.
5. Type of mounting
TL – Tubeless mounting, only without tube.
TT – Tube Type mounting, only with tube.
TL/TT – Can be mounted with or without a tube, depending on the motorcycle's wheel.
6. Wear indicator (this marking, located on the shoulder, indicates the indicator).
7. INMETRO certification (stamped on the sidewall).
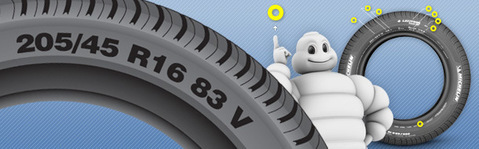
Other possible nomenclatures are required by international regulations:
. DOT (North American) Indicates the factory, product dimension, and week/year of manufacture).
. Reinforced Mark If available, indicates that the tires are reinforced to support a greater load capacity.
Warning: observe, before mounting, if there is any indication of the direction of rotation on the sidewall of the tire. Incorrect mounting will lead to abnormal behavior, endangering the safety, performance, and durability of the tires.
The codes:
A Speed Code and Load Index
B Producing country
C Trademark
D DOT homologation
E Week/year of production
F ECE homologation
G UTQC certification
H Structure type (radial)
I Maximum load and pressure (USA, Canada, Australia)
L Structure composition
M Wear indicator position
N Homologation for mud/snow
O Dimension characteristics
P Mounting with/without inner tube (Tube Type, with tube, tubeless without tube)
Q Reinforced structure
Spark plugs
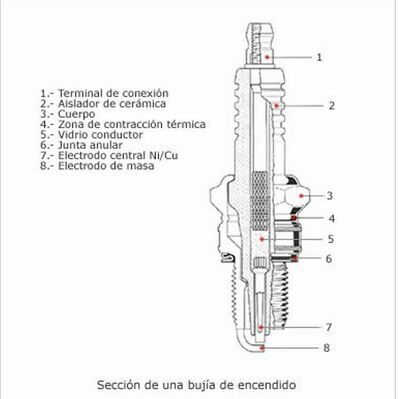
Check the spark plugs at the correct intervals.
Disconnect the spark plug cables by pulling upwards on the molded caps of the connectors.
Verify the type of spark plug. Only use the spark plugs specified for your motorcycle model.
Check the spark plug gap by comparing it to the specifications table.
NOTE: If a torque wrench is not available, tighten the new spark plugs by hand and then give an additional quarter turn with a spark plug wrench.
Always tighten to the correct torque. The spark plugs must be tightened to the specified torque to transfer heat properly.
Connect each molded connector cap until the cap snaps firmly in place over the spark plug.
Battery
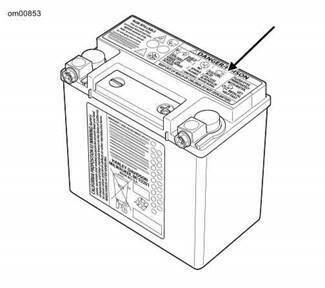
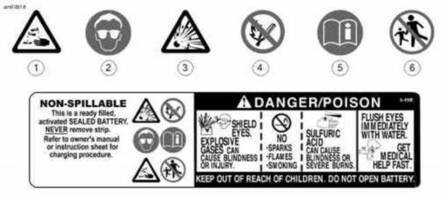
Never remove the warning label attached to the top of the battery. Failure to read and understand all precautions contained in the warnings may result in death or serious injury.
Battery warning label
1. The contents are corrosive
2. Use safety glasses
3. The contents are explosive
4. Keep away from flames
5. Read the instructions
6. Keep out of reach of children
Voltmeter test
The voltmeter test provides a general indicator of the battery condition. Check the battery voltage to ensure it is 100 percent charged. If the open circuit voltage (disconnected) reading is below 12.7 V, charge the battery and recheck the voltage after allowing the battery to rest for one or two hours.
VOLTS READING | CHARGE PERCENTAGE |
12.7 | 100 |
12.6 | 75 |
12.3 | 50 |
12.0 | 25 |
11.8 | 0 |